

How To Draw Anime Face
This step past footstep tutorial shows how to depict a semi-realistic looking female person anime face that differs from the more than traditional anime styles.
Drawing a realistic looking anime face is a little more challenging than cartoon a "standard" anime or manga style face. While the actual drawing process itself is not much more difficult the challenge comes in balancing between semi-realistic facial features and maintaining an anime look.
To help with that challenge this tutorial provides a detailed breakup of the drawing process. It includes an explanation of how to draw the head and each of the major facial features to achieve a more "realistic" look.
Be sure to make low-cal lines for the initial stages of the drawing and then that y'all can easily erase parts of them later. The lines in the examples are dark simply so that you can run into them. You tin go over your drawing with darker lines after you are certain everything is in the right identify and afterwards y'all erase all o the guide lines and parts of the face that will be subconscious by the hair.
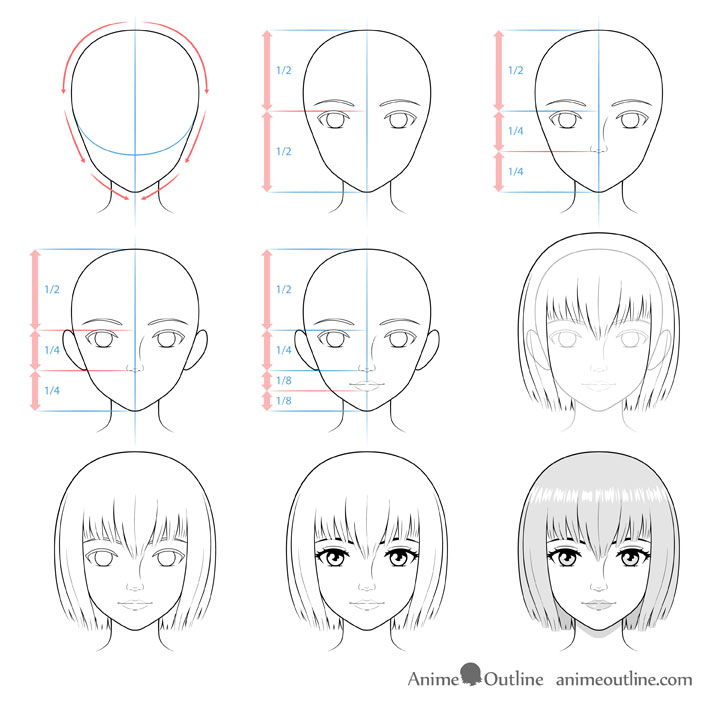
Stride i – Drawing a Semi-Realistic Looking Anime Caput
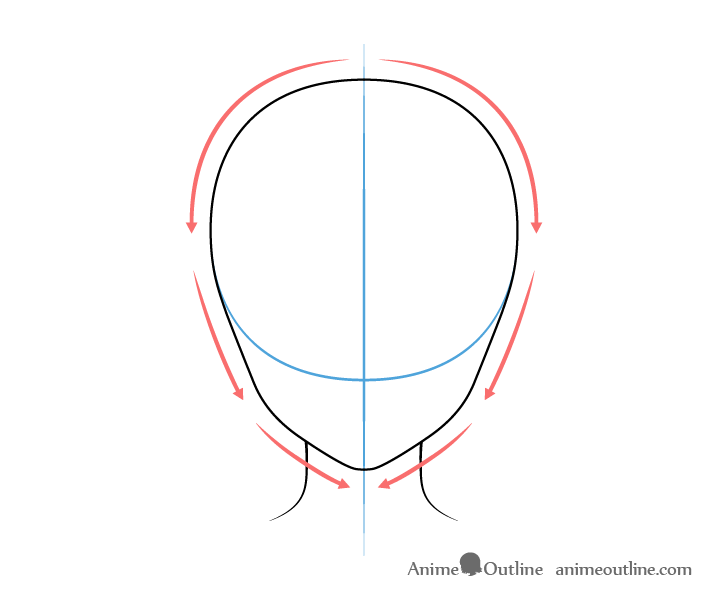
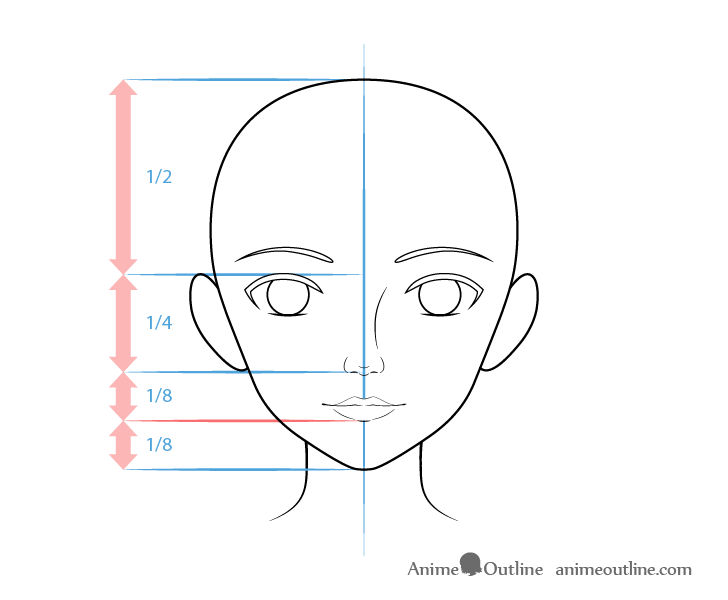
Anime characters generally have adequately circular faces. The bottom portion of an anime face is unremarkably drawn with two major sets of lines, one going down from the top of the caput to around the mouth surface area and one more from at that place to the chin. The chin itself tends to be drawn either completely pointy or with a tiny curve.
For a more realistic looking anime face up draw the caput in near the same fashion but with a flatter and wider chin (closer to a real chin). You can too optionally brand the caput a fiddling "taller" (longer vertically).
Start the drawing with a vertical line to help you brand sure both halves of the face are even. Next you can draw the rounded shape for the top of the head and projection the lines of the bottom portion of the head as been described.
For different styles of anime heads y'all tin see:
How to Describe Different Styles of Anime Heads & Faces
For examples of various styles of eyes check:
How to Describe Different Types of Anime and Manga Optics
Step two – Drawing the Eyes

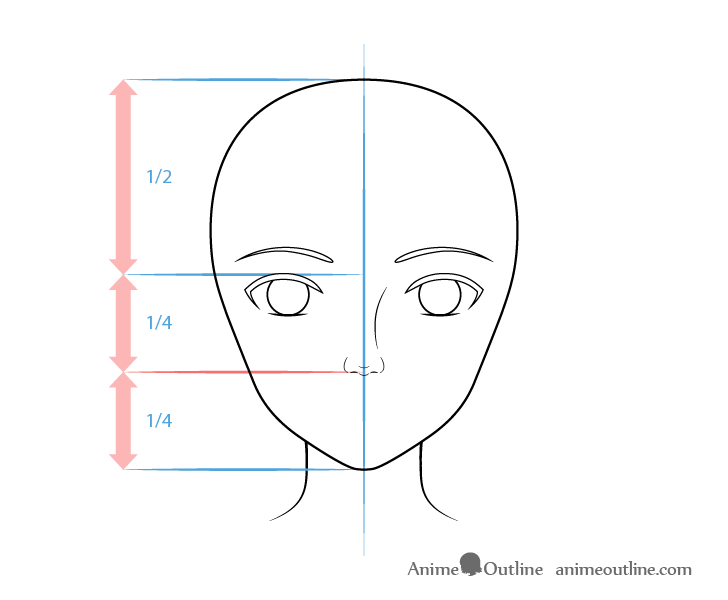
Position the eyes the aforementioned as you would for more traditional looking anime characters (as suggested in other tutorials here on AnimeOutline). To exercise this by describe a horizontal line through the middle of the face and describe the eyes beneath that line. Space the optics so that y'all tin can fit another centre betwixt them.
Draw the optics vertically narrower than common anime eyes simply larger than existent eyes. Make the irises round (anime irises and pupils are often vertically stretched).
You lot can leave the smaller details of the eyes such every bit the pupils reflections and eyelashes for later after you insure that all of the other facial features are correctly placed. For an explanation of why you want to depict this manner as well as other anime related drawing advice encounter:
Beginner Guide to Drawing Anime & Manga
Stride 3 – Cartoon a Semi-Realistic Nose
While traditional anime noses are oftentimes just draw with a dot (in the front view) for a more realistic looking style you can draw a nose that is a lot closer in shape and proportions to a real ane.
Position the olfactory organ as you would for a traditional looking anime character with the bottom of the nose being between the chin and the horizontal halfway point through the face. (once again aforementioned as other tutorials here on AnimeOutline).
The entire drawing of the more than realistic looking nose can pretty much be cleaved downward into diverse curves. Depict 2 small curves for the nostrils, two more curves to give a hint of the sides of the nose. Ad the tip of the olfactory organ with i small curve and finally show the bridge of the nose with one adequately long curved line. Exist sure to just draw the last line on one side of the nose. your cartoon will wait odd if you add it on both sides.
For more variations of anime noses see:
How to Draw Anime and Manga Noses
Stride 4 – Drawing the Ears
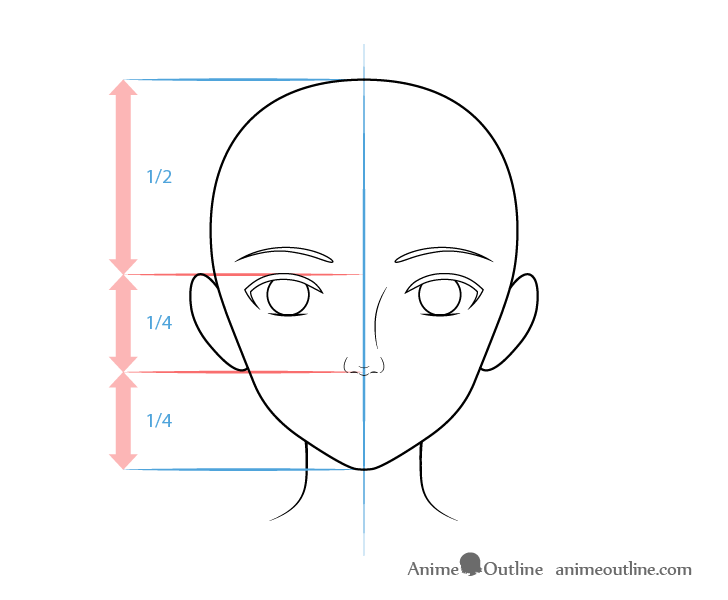
Draw the ears pretty much equally you would with most other anime styles. Draw the superlative of the ears to marshal with the meridian of the eyes and the lesser of the ears to align with the lesser of the nose.
For detailed examples of drawing anime ears check:
How to Draw Anime and Manga Ears
Please note that the ears in this tutorial will eventually exist fully covered by the hair and erased for the final steps so drawing them is optional.
Step 5 – Drawing the Oral fissure & Lips
Anime mouths are commonly drawn without lips but you can add them if you lot want a more realistic looking mouth.
Position the mouth with the bottom lip halfway between the bottom of the olfactory organ and the bottom of the chin.
Draw the mouth itself every bit a bend with a intermission in the middle where the lines curve slightly downwards. You lot tin too draw it wider than more than traditional anime mouths.
For a very detailed explanation of cartoon the lips yous can see the tutorial beneath:
How to Depict Anime Lips Tutorial
Footstep 6 – Drawing Semi-Realistic Anime Pilus
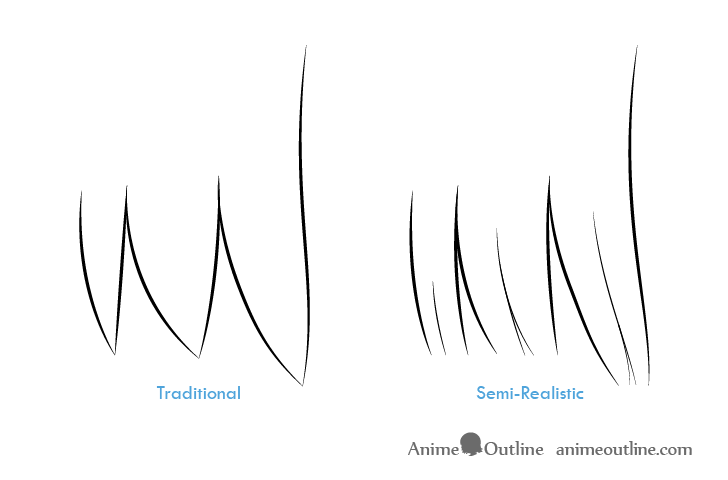
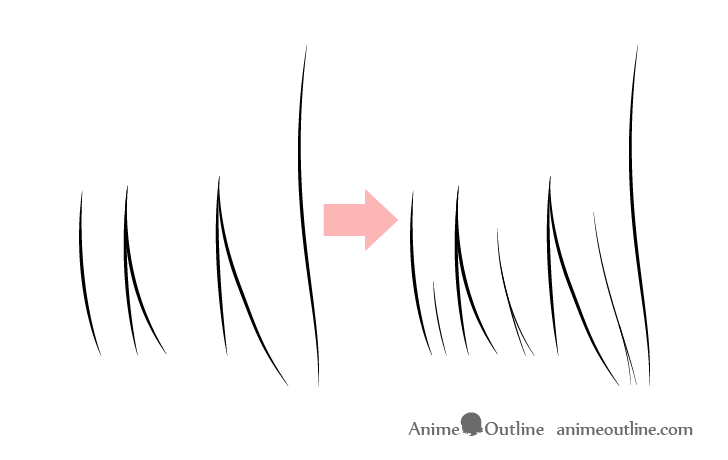
Anime hair is by and large drawn in pointy clumps. For more realistic looking hair you lot can withal view it every bit a set of clumps but without the pointy ends. Instead leave the terminate of the clump "open" and draw some lines into these openings to give an advent of pilus strands. This will create a hair that is still adequately easy to draw but looks more realistic.
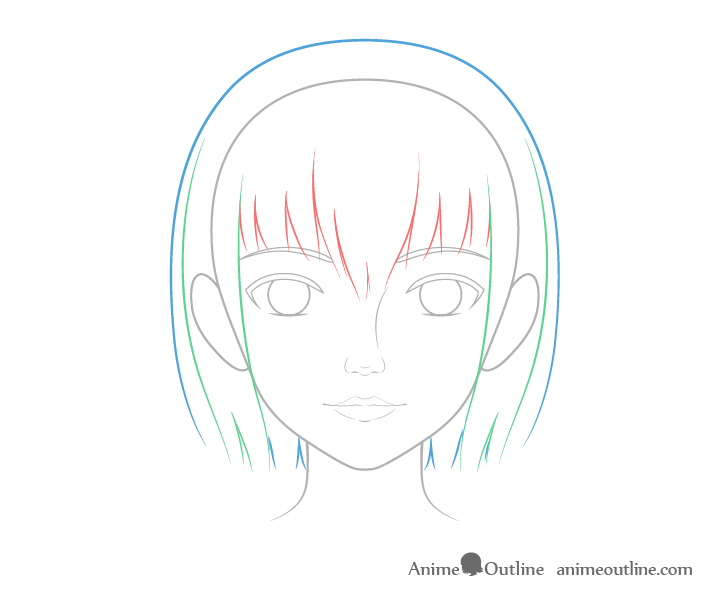
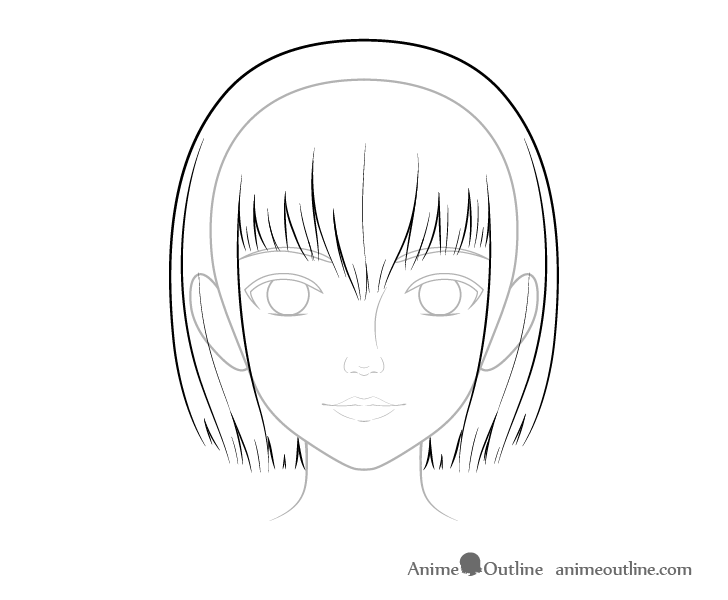
To better understand how to draw the hair it can also exist very helpful to recall of it equally existence divide into tree parts (as shown in the instance in a higher place):
- Blood-red – Front Hair
- Green – Side Hair
- Blue – Dorsum/Superlative Pilus
For cartoon unlike types of more traditional anime hairstyles using this approach see:
How to Depict Anime and Manga Hair – Female
Keeping the higher up in heed start the actual drawing of the pilus by outlining it's overall shape and calculation the open concluded clumps as described above. Don't add the smaller splits just even so.
One time you finish drawing the major shapes of the hair you can and so go ahead and add together the smaller splits in between the larger clumps to give it a little more than detail.
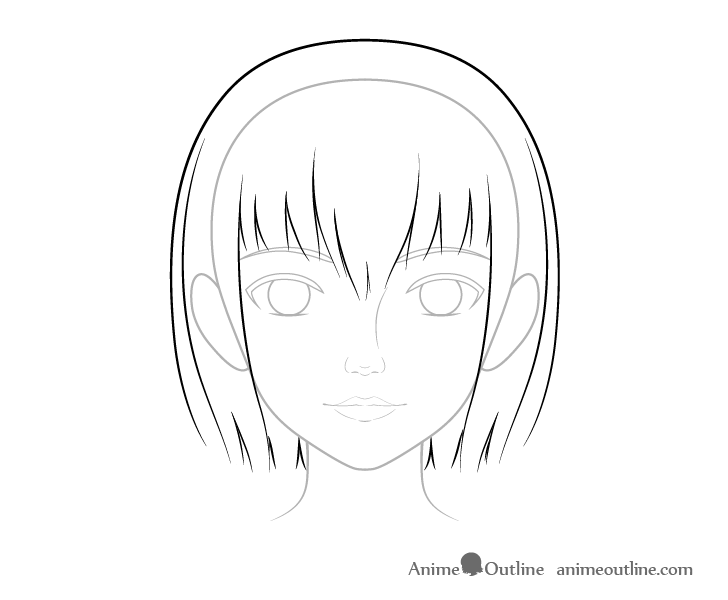
When you are finished you should accept a cartoon similar to the example above.
For more on cartoon anime pilus you tin can also check out:
How to Draw Anime Pilus Blowing in Different Directions
Step 7 – Cleaning upward the Drawing
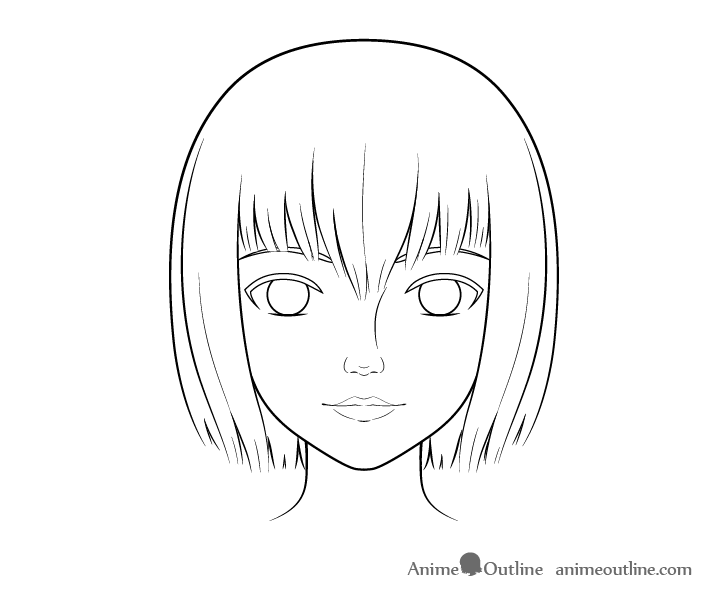
For this brusque step y'all tin simply erase the parts of the head and face that are covered past the pilus. Once you are washed you should take a clean line with all of the facial features in their places.
Step eight – Drawing the Pocket-size Details of the Eyes

Afterward you have the basic line drawing of the face you lot can get alee and add in the small details of the eyes.
For a step by step breakdown of drawing anime eyes meet:
How to Draw Female Anime Eyes Tutorial
While the optics in that tutorial are slightly different from those in this case pretty much the same drawing steps however apply. Simply tweak them to look more like the the ones in the case above.
Information technology was too suggested at the kickoff of this tutorial that you should brand lite lines for information technology's initial steps. Once you lot've reached this point you can go over your drawing with darker lines.
Stride 9 – Finishing the Cartoon by Applying Shading
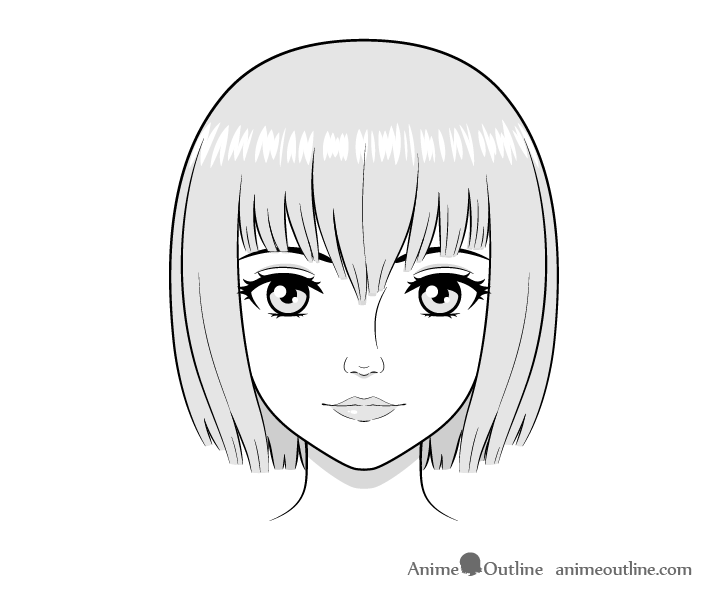
To finish the cartoon you can add some very bones shading.
For very generalized shading with no 1 clear light source shade the areas most probable to have shadows. These shadows will normally be:
- Cast by the pilus on the forehead area
- Effectually the eyelids
- Bottom of the nose
- Upper expanse of the neck (cast by the head)
- Inner/Groundwork area of the hair
For shading an anime character's face up in dissimilar lighting conditions encounter:
How to Shade an Anime Face up in Different Lighting
Be sure to leave the area of the highlights in the hair white as well every bit a small highlight area on the lips.
For examples of various kinds of hair highlight run into:
Different Means to Draw Anime Hair Highlights
Conclusion
It can be a footling bit tricky to find the correct balance between anime and realism when trying to draw a semi-realistic looking anime character. While this tutorial offers some guide lines in that location is no ane gear up way to draw these types of characters. You lot can experiment for yourself by adding more realistic or more stylized facial features and see what kind of a results you lot come up with.
For drawing more "traditional" looking female person anime faces come across:
- How to Describe an Anime Girl'south Caput and Face
- How to Draw a Beautiful Anime Girl Step past Step
- How to Depict Anime Characters Tutorial
- 8 Step Anime Woman'due south Head & Face up Cartoon Tutorial
- How to Draw a Cute Anime Girl Step past Step
- How to Describe Anime Christmas Santa Hat Girl

Source: https://www.animeoutline.com/how-to-draw-a-realistic-anime-face-step-by-step/
Posted by: bunchhollices.blogspot.com
0 Response to "How To Draw Anime Face"
Post a Comment